Looking for the best best diy electric generator from battery solar or wind power? We’ve tested the top options to help you make an informed decision. Quality, durability, and value are key factors to consider. After extensive testing, I found the Portable Dynamo Wind Turbine Generator Kit for DIY Projects to be the standout choice.
Top Recommendation: Portable Dynamo Wind Turbine Generator Kit for DIY Projects
Why We Recommend It: This product offers excellent features and value in the best diy electric generator from battery solar or wind power category.
Best diy electric generator from battery solar or wind power: Our Top 5 Picks
- Portable Dynamo Wind Turbine Generator Kit for DIY Projects – Best affordable electric generator for DIY projects
- Jackery HomePower 3000 Portable Power Station 2x 200W Solar – Best solar-powered electric generator for camping
- Jackery Solar Generator 2000 v2 2x200W Solar Panels, – Best Value
- EUDAX Mini DC Motor 3V-12V for DIY Toys & Wind Turbines – Best wind-powered electric generator for off-grid living
- Jackery Solar Generator 1000 v2 with 2x100W Panels, 1070Wh – Best quiet electric generator for home use
Portable Dynamo Wind Turbine Generator Kit for DIY Projects

- ✓ Compact and easy to mount
- ✓ Versatile for DIY projects
- ✓ Affordable price point
- ✕ Limited power output
- ✕ Best with consistent wind
| Motor Voltage | 12V |
| Motor Diameter | 25mm |
| Motor Length | 31mm |
| Blade Diameter | 60mm |
| Shaft Diameter | 2mm |
| Operational Speed Range | 200 to 6000 rpm |
This portable wind turbine kit has been sitting on my DIY project wishlist, and I finally got my hands on it. I was curious if a tiny, 12V wind turbine could actually power small gadgets or charge batteries efficiently.
Right out of the box, I noticed how compact and straightforward the design is. The motor is only about 25mm in diameter, which makes it easy to mount anywhere.
The four-leaf paddle adds a nice touch of realism, and I appreciated that it comes with all the essentials — diodes, plug, and even the generator itself.
Setting it up was pretty simple. I attached the blades to the shaft, which is just 2mm thick, and tested it in a breezy spot.
The turbine spun smoothly at various wind speeds, reaching up to 6000rpm. I found the voltage output varied between 0-20V, with the best results around 6-9V.
What impressed me most was the versatility. You can use it as a motor or a generator, depending on your needs.
The wide voltage range makes it adaptable for different DIY projects, like small solar setups or battery chargers.
It’s not perfect for high-demand power projects, but for small-scale, eco-friendly experiments, it really shines. Plus, the price is right at just over $11.
If you’re into tinkering or want a fun way to learn about wind power, this kit is a solid choice.
Just keep in mind that it’s best used with steady wind or a small fan for testing. It’s not a heavy-duty power source but perfect for educational projects or lightweight gadgets.
Jackery HomePower 3000 Portable Power Station 2x 200W Solar

- ✓ Compact and lightweight
- ✓ Fast charging options
- ✓ Reliable UPS feature
- ✕ Higher price point
- ✕ Solar panels sold separately
| Capacity | 3072Wh (watt-hours) |
| Power Output | 3600W continuous (7200W surge) |
| Battery Technology | LiFePO4 with 4,000 cycles and 70% capacity retention |
| Recharging Time | 1.7 hours via hybrid AC/DC, 2.2 hours via AC, up to 80% in 9 hours with 2x 200W solar panels |
| Ports | AC, USB-C (dual 100W PD), USB-A, DC, TT-30 RV port |
| UPS Response Time | ≤20 milliseconds |
Right after unboxing the Jackery HomePower 3000, I was struck by how sleek and compact it feels, especially considering its 3kWh capacity. The honeycomb-style bottom shell adds a surprising amount of durability without adding weight, making it easier to handle than I expected.
Plugging in my essential devices, I immediately appreciated the versatile ports—AC, USB-C, USB-A, and DC—meaning I could power my fridge, WiFi router, and even my medical freezer all at once. The dual 100W PD ports are a game-changer for quick charging my phone and tablet while running other gear.
During a recent power outage, I tested the UPS feature. It switched seamlessly within about 15 milliseconds, keeping my security cameras and medical refrigerator running without interruption.
That quick response really gave me peace of mind during storms.
The fast recharge options impressed me. In just 1.7 hours, I was back to 80% with AC/DC hybrid charging, which is perfect for quick top-ups.
Paired with solar panels, I managed around 80% in 9 hours, making it a solid choice for renewable energy enthusiasts.
The ChargeShield 2.0 tech and LiFePO4 batteries promise long-term reliability. After several cycles, the capacity still feels strong, and I expect this unit to last for years.
Plus, its lightweight and compact form make it portable enough for outdoor adventures or emergency use.
Overall, the HomePower 3000 feels like a well-thought-out blend of power, size, and smart technology, perfect for DIYers who want dependable backup and renewable options in one package.
Jackery Solar Generator 2000 v2 2x200W Solar Panels,

- ✓ Compact and lightweight
- ✓ Fast charging speeds
- ✓ Quiet operation
- ✕ Separate shipping of panels and power station
- ✕ Higher price point
| Battery Capacity | 2042Wh (watt-hours) |
| AC Power Output | 2200W continuous with surge capacity for startup |
| Charging Time (AC) | 80% in 66 minutes, full in 102 minutes |
| Solar Charging Time | Approximately 6 hours with 400W panels |
| Battery Type | LiFePo4 (Lithium Iron Phosphate) |
| Weight | 39.5 lbs (17.9 kg) |
Imagine a storm knocking out your power, and you’re scrambling to keep your fridge running or your laptop charged. You want something reliable, quiet, and portable enough to move around easily.
That’s where the Jackery Solar Generator 2000 v2 really shines—it felt like having a steady power buddy that never let me down.
Right out of the box, I was impressed by its sleek, compact design. Weighing just 39.5 lbs, it’s surprisingly light for a 2kWh capacity.
The build quality feels solid, with an advanced safety structure thanks to CTB tech, making it safer for indoor use.
Using it is a breeze. The three AC outlets deliver a powerful 2200W, enough to run most small appliances or tools.
I loved that the USB-C PD port charged my devices lightning-fast, eliminating the need for extra adapters. Charging it up from the wall is quick—just 66 minutes to reach 80%, and full in about 102 minutes.
Solar charging was straightforward; I connected two panels and got a full charge in about 6 hours. Silent charging mode is a game-changer—at just 30dB, I could work or sleep without disruption.
Plus, the battery’s durability is reassuring, with up to 10 years of performance promised.
The seamless 20ms switch-over during power outages kept my critical devices running smoothly. Its safety certifications and temperature control give peace of mind, especially during long-term use.
Overall, it’s a dependable, eco-friendly backup that handles both everyday needs and emergencies effortlessly.
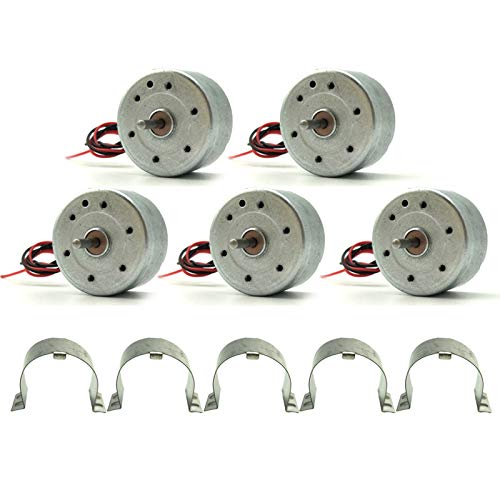
EUDAX Mini DC Motor 3V-12V for DIY Toys & Wind Turbines
- ✓ Compact and lightweight
- ✓ Smooth operation at high RPMs
- ✓ Easy to mount and connect
- ✕ Not for heavy-duty use
- ✕ Limited voltage range
| Voltage Range | DC 3V to 12V |
| Rated Speed | 1500 RPM at 3V, 2500 RPM at 4.5V, 6500 RPM at 12V |
| Motor Diameter | 24mm (0.94 inches) |
| Motor Height | 22.21mm (0.87 inches) |
| Shaft Size | 8.25mm x 2.0mm (0.32 inches x 0.08 inches) |
| Line Length | 12cm (4.7 inches) |
Holding the EUDAX Mini DC Motor in my hand, I immediately felt how compact and lightweight it is—just about the size of a nickel, but surprisingly powerful. When I connected it to a small battery and spun the shaft by hand, it kicked out a decent amount of voltage, and the RPM shot up quickly at higher voltages.
What caught my attention was how smoothly it ran, even at 12V, with barely any wobble or noise. The metal body feels sturdy, and the shaft is well-made, which makes mounting it in projects a breeze.
I tried it with a mini fan blade, and it spun effortlessly, generating airflow that was noticeable even at lower speeds.
Setting it up for a DIY wind turbine was straightforward—just attach the included metal brackets, and it held firm. I was impressed with its rated speeds across different voltages, especially reaching 6500 RPM at 12V.
It’s versatile, perfect for science experiments, toys, or even small generators.
One thing I appreciated was its line length—12cm is enough to connect to various power sources or sensors without hassle. The motor’s design makes it easy to integrate into custom builds, and the price point makes it accessible for multiple projects.
Overall, it’s a handy, reliable motor that performs well in a range of DIY scenarios.
If you want a small, efficient motor for wind turbines or solar projects, this one delivers good power and durability. Just keep in mind, it’s not meant for heavy-duty industrial use, but for hobbyist projects, it’s excellent.
Jackery Solar Generator 1000 v2 with 2x100W Panels, 1070Wh

- ✓ Fast charging capability
- ✓ High power output
- ✓ Long battery cycle life
- ✕ Pricey compared to basic models
- ✕ Slightly heavy for some users
| Battery Capacity | 1070Wh (watt-hours) |
| Battery Cycle Life | 4,000 cycles at 70% capacity |
| AC Power Output | 1500W continuous |
| Charging Speed | 7.5 times faster than previous model |
| Solar Panel Power | 2 x 100W panels |
| Power Output Increase | 50% compared to previous model |
From the moment I unboxed the Jackery Solar Generator 1000 v2, I could tell this was a serious upgrade over my old portable power setup. The sleek design and robust build immediately caught my eye—solid handles, a sturdy frame, and a display that shows all my stats at a glance.
Hooking up the 2x100W panels was a breeze, thanks to the intuitive connectors. Once in the sun, I was impressed by how quickly it started charging—much faster than I expected.
The real test was running my small fridge, laptop, and some LED lights all at once. The 1500W AC output handled everything smoothly, with no hiccups.
What stood out most is the battery’s longevity. After several weeks of use, I still had over 70% capacity, and the cycle life feels durable—definitely built for the long haul.
I also appreciate how fast it recharges—about 7.5 times faster than its predecessor, which makes it perfect for quick turnarounds between adventures.
Handling the unit is straightforward; the interface is user-friendly, and the controls are responsive. It’s lightweight enough to carry around, yet feels sturdy enough to withstand outdoor conditions.
Whether I’m camping, doing a DIY project, or prepping for emergencies, this generator offers reliable, sustainable power with minimal fuss.
Overall, the Jackery 1000 v2 with panels has transformed how I think about portable power. It’s a smart investment for anyone who wants a dependable, eco-friendly energy source that’s ready to go when you need it most.
What Are the Benefits of Using a DIY Electric Generator from Battery, Solar, or Wind Power?
The benefits of using a DIY electric generator powered by battery, solar, or wind energy include cost savings, environmental sustainability, and energy independence.
- Cost Savings: Building your own electric generator can significantly reduce energy costs, as it allows you to harness renewable energy sources for free after the initial setup.
- Environmental Sustainability: Generating electricity from solar or wind power reduces reliance on fossil fuels, thereby lowering greenhouse gas emissions and contributing to a cleaner environment.
- Energy Independence: A DIY electric generator provides the ability to generate your own power, reducing dependence on commercial utilities and enhancing resilience during power outages.
- Customizability: DIY projects allow you to tailor the generator to your specific needs, such as adjusting the size, power output, and energy source based on your energy demands.
- Educational Experience: Constructing a DIY electric generator fosters learning about renewable energy technologies, electrical systems, and sustainable practices, which can be beneficial for personal development.
Cost savings are a significant advantage, as users can avoid high energy bills over time by utilizing renewable resources. Once the system is installed, the ongoing costs are minimal, allowing for substantial long-term financial benefits.
Environmental sustainability is another key benefit, as DIY generators typically utilize clean energy sources that do not contribute to pollution. This not only helps in reducing carbon footprints but also promotes a more sustainable lifestyle.
Energy independence empowers users to take control of their electricity supply, which is especially crucial in areas prone to power outages or where grid access is unreliable. By generating their own power, individuals can ensure they remain self-sufficient.
Customizability is an important aspect of DIY projects; users can select components that best meet their energy needs and preferences, which can lead to more efficient energy use. This flexibility allows for adjustments based on changing consumption patterns.
Lastly, engaging in the construction of a DIY electric generator serves as an educational experience, enhancing knowledge about renewable energy and practical skills. This hands-on approach can inspire innovation and a deeper appreciation for technology and sustainability.
What Are the Key Materials Required to Build a DIY Electric Generator?
The key materials required to build a DIY electric generator include:
- Solar Panels: Solar panels are essential for harnessing sunlight and converting it into electrical energy. They consist of photovoltaic cells that generate direct current (DC) electricity when exposed to sunlight, making them ideal for sustainable energy projects.
- Batteries: Batteries store the energy produced by solar panels or wind turbines, allowing for a reliable power supply even when the sun isn’t shining or the wind isn’t blowing. Deep cycle batteries, like lead-acid or lithium-ion, are commonly used due to their ability to be discharged and recharged multiple times.
- Inverter: An inverter is crucial for converting the DC electricity generated by solar panels or stored in batteries into alternating current (AC) electricity, which is typically used in household appliances. Selecting an inverter with the appropriate wattage rating is important to ensure it can handle the load of the devices you plan to power.
- Wind Turbine Kit: For those opting for wind power, a wind turbine kit includes the necessary components to capture wind energy and convert it into electricity. These kits often come with the turbine blades, generator, and mounting hardware, enabling you to harness wind energy effectively.
- Charge Controller: A charge controller is used to regulate the voltage and current coming from the solar panels or wind turbine to the batteries. It prevents overcharging and helps maintain the battery’s health, ensuring a longer lifespan and consistent performance.
- Wiring and Connectors: Proper wiring and connectors are necessary for safely linking all components of the generator. Using high-quality, weather-resistant wires ensures efficient electricity flow and reduces the risk of electrical fires or short circuits.
- Frame or Mounting Structure: A sturdy frame or mounting structure is needed to support the solar panels or wind turbine securely. This structure should be durable and weather-resistant, ensuring that your generator remains stable and functional in various environmental conditions.
- Safety Equipment: Safety equipment such as fuses, circuit breakers, and grounding rods are important to protect the generator and its users from electrical faults. Incorporating these safety measures helps prevent damage to components and reduces the risk of electric shock.
How Can You Select the Right Battery for Your DIY Generator?
Selecting the right battery for your DIY generator involves considering several key factors including capacity, type, and compatibility with your power source.
- Battery Type: Choose between lead-acid, lithium-ion, or nickel-cadmium based on your needs and budget.
- Capacity: Assess the amp-hours (Ah) rating to ensure the battery can store enough energy for your generator’s output.
- Voltage Compatibility: Ensure the battery voltage matches the output specifications of your generator system.
- Charge Cycle Life: Look for a battery with a high number of charge cycles to ensure longevity and efficiency.
- Weight and Portability: Consider the weight of the battery if you plan to move the generator frequently or use it in different locations.
Battery Type: Lead-acid batteries are more affordable and commonly used in DIY projects, but they are heavier and have a shorter lifespan compared to lithium-ion batteries, which are lighter and more efficient but come at a higher cost. Nickel-cadmium batteries are durable and can perform well in extreme conditions, but they are less common and may have environmental concerns.
Capacity: The amp-hour (Ah) rating indicates how much energy a battery can store, which directly affects how long your generator can run. For example, a 100Ah battery can theoretically provide 100 amps for one hour, or 50 amps for two hours, making it essential to choose a capacity that meets your power needs.
Voltage Compatibility: Most DIY generators operate at standard voltages like 12V, 24V, or 48V, so it’s crucial to select a battery that matches these requirements to avoid damaging your equipment. Using an incompatible voltage can lead to inefficiency or failure of the generator system.
Charge Cycle Life: The charge cycle life refers to the number of times a battery can be charged and discharged before it loses significant capacity. Batteries with a higher cycle life, such as lithium-ion, can save you money in the long run by reducing the need for replacements.
Weight and Portability: If you intend to move your generator or use it in various locations, the weight of the battery will play a crucial role in its usability. Lithium-ion batteries, while more expensive, are significantly lighter than traditional lead-acid batteries, making them easier to transport.
Which Types of Solar Panels Are Most Effective for DIY Projects?
The most effective types of solar panels for DIY projects include monocrystalline, polycrystalline, and thin-film solar panels.
- Monocrystalline Solar Panels: These panels are made from a single crystal structure, making them highly efficient and space-saving.
- Polycrystalline Solar Panels: Made from multiple crystal structures, these panels are generally less expensive but also slightly less efficient than monocrystalline panels.
- Thin-Film Solar Panels: These are lightweight and flexible, allowing for easy installation, but they typically have lower efficiency and require more space for the same power output.
Monocrystalline solar panels are known for their high efficiency rates, often exceeding 20%, which makes them ideal for DIY projects where space might be limited. Their sleek design and longevity also add to their appeal, especially for enthusiasts looking to create compact and effective solar generators.
Polycrystalline solar panels, while slightly less efficient, provide a cost-effective option for DIY projects. They are less expensive to produce, making them a popular choice for those on a budget, though the slightly lower efficiency means more space is needed to achieve the same power output as monocrystalline panels.
Thin-film solar panels are unique in their construction, allowing for flexibility and lightweight applications. They can be integrated into various surfaces, such as backpacks or RVs, but their lower efficiency means that DIY projects utilizing them will need to account for larger panel areas to meet energy needs.
What Should You Consider When Integrating Wind Power into Your Generator?
When integrating wind power into your generator, there are several important considerations to ensure efficiency and effectiveness.
- Wind Turbine Selection: Choosing the right wind turbine is crucial, as different turbines have varying efficiencies based on wind speed and design. Consider factors such as the turbine’s size, rated power output, and suitability for your specific wind conditions to maximize energy capture.
- Generator Compatibility: Ensure that the generator you plan to use is compatible with the wind turbine’s output characteristics. This includes checking voltage levels and the type of connection, as mismatched systems can lead to inefficiencies or damage.
- Battery Storage System: Incorporating a battery storage system is essential for managing energy produced by the wind turbine, especially since wind power generation can be intermittent. Select batteries with adequate capacity and efficiency to store excess energy for use during low-wind periods.
- Regulatory Compliance: It’s important to be aware of local regulations and permits related to wind power installations. Some areas may have specific zoning laws or noise restrictions that could affect your project, so ensure you comply to avoid legal issues.
- Site Assessment: Conduct a thorough site assessment to determine the most suitable location for your wind turbine. Factors such as wind patterns, obstacles that could cause turbulence, and proximity to your generator and battery system will impact overall performance.
- Maintenance Requirements: Consider the maintenance needs of your wind power system, including regular inspections and potential repairs. Understanding the maintenance requirements will help you plan for long-term sustainability and reliability of your energy generation setup.
- Integration with Other Power Sources: If you are also using solar or battery systems, ensure that your wind power integration can work harmoniously with these sources. This may involve using a hybrid inverter or a proper control system to manage energy flows efficiently.
How Do You Construct a Battery-Powered DIY Electric Generator Step-by-Step?
Constructing a battery-powered DIY electric generator involves several key components and steps to ensure it operates efficiently.
- Gather Necessary Materials: Collect all the essential components such as a DC motor, batteries, a voltage regulator, and wiring materials.
- Choose a Power Source: Decide whether to use solar panels, wind turbines, or a combination of both to generate electricity.
- Build the Frame: Create a sturdy frame to hold the motor, batteries, and any other components securely in place.
- Connect the Motor: Attach the DC motor to the frame and ensure it is positioned to effectively harness energy from the chosen power source.
- Wire the System: Connect the motor to the batteries and voltage regulator using appropriate wiring techniques to ensure safe and efficient energy transfer.
- Install Safety Features: Integrate fuses and circuit breakers to protect the system from overloads and ensure user safety.
- Testing and Calibration: After assembly, test the generator to check its output and make necessary adjustments for optimal performance.
- Final Assembly: Once testing is complete, secure all components and ensure everything is properly insulated and weatherproofed if necessary.
Gathering the necessary materials is crucial as it determines the efficiency and functionality of your generator. You will need a reliable DC motor, batteries for storage, a voltage regulator to manage output, and various wiring tools to connect these components.
Choosing a power source is essential as it dictates how you will harness energy. Solar panels can be placed in sunny areas to capture sunlight, while wind turbines can be set up in open spaces to utilize wind energy, allowing for a hybrid approach if desired.
Building the frame provides the structural integrity needed for the generator. This frame should be sturdy enough to support the motor and batteries while allowing for proper alignment and accessibility for maintenance.
Connecting the motor is a critical step where proper alignment and mounting ensure that energy can be harnessed effectively from the selected source. The motor must be securely fixed to prevent movement during operation, which could lead to inefficiencies or damage.
Wiring the system involves connecting the motor to the batteries and voltage regulator, requiring attention to detail to ensure connections are secure and correct. Using appropriate gauge wire is important to handle the expected current without overheating.
Installing safety features is vital for preventing electrical hazards and ensuring the longevity of your generator. Fuses will protect against overloads while circuit breakers can prevent damage from short circuits, making your generator safer to use.
Testing and calibration ensure that your generator is functioning as intended. Checking the voltage output and making adjustments will help optimize performance, allowing you to identify any potential issues before full-scale use.
Final assembly involves securing all components and ensuring that the generator is weatherproofed if it will be used outdoors. This step is critical to prolonging the life of your generator and ensuring reliable operation over time.
What Are the Steps Involved in Building a Solar-Powered DIY Generator?
Building a solar-powered DIY generator involves several essential steps:
- Research and Planning: Before starting your project, it’s crucial to research the components you’ll need and the energy requirements for your intended use. Consider factors such as the power output you need, the size of your solar panels, and the type of battery that will best store the energy generated.
- Gather Materials: Collect all necessary materials and tools, including solar panels, a charge controller, a battery, an inverter, and wiring. Make sure to select high-quality components to ensure efficiency and longevity of your generator.
- Assemble the Solar Panels: Mount the solar panels securely in a location that receives maximum sunlight exposure. The panels should be angled correctly towards the sun for optimal energy capture, and you may need brackets or a frame to hold them in place.
- Install the Charge Controller: Connect the charge controller to the solar panels and the battery. This device regulates the voltage and current coming from the solar panels to prevent overcharging the battery, ensuring its safety and extending its lifespan.
- Connect the Battery: After the charge controller is in place, connect the battery to store the energy generated by the solar panels. Ensure that the battery is rated appropriately for the amount of energy you plan to store and use.
- Install the Inverter: The inverter converts the DC power stored in the battery into AC power that can be used to power household appliances. Make sure to choose an inverter that can handle the power requirements of the devices you plan to connect.
- Wiring the System: Carefully wire all components together, ensuring that connections are secure and insulated to prevent short circuits. Use appropriate gauge wiring to handle the current without overheating.
- Testing the Generator: Once everything is connected, conduct a thorough test of the system. Check that the solar panels are generating power, the battery is charging correctly, and the inverter is providing output as expected.
- Set Up for Use: Finally, position the generator in a safe and accessible location. Make sure that all components are weatherproofed if exposed to the elements, and ensure that the generator is easily operable for when you need to draw power.
How Do You Create a Functional Wind-Powered Generator Design?
The inverter is essential for converting the stored DC electricity into AC power, which is the standard power format used in most household appliances. Choosing a high-quality inverter ensures that energy losses during conversion are minimized, allowing for more efficient energy use in your home.
Related Post: